Sunday, January 21, 2024

Fluted plate in 'Green Tea'

This started out as a bowl, specifically a dog bowl, but it turned into a plate. Then it had so many fingerprints on it, I went all the way and added more, plus the fluting.


My granddaughter came over and I tasked her with glazing the bowl. I suggested Mayco 'Stone Denim', but she thought Mayco 'Green Tea' would be better. I was hoping the texture is deep enough for the glaze to "break" over it.


I am enamored with the results.


I'm not sure what this plate could be used for, other than be an object to admire. Almost all my finished pieces sit on a "sideboard" by the front door, so that visitors can pick one if they so choose, but this one may be a keeper.


Any lessons learned here? So far, most of my vessels don't have feet or rings on the bottom, but I think that is something I should work to add next.

Thursday, January 18, 2024

Dipping bowls

When I purchased a set of wood forms, I didn't think about how small the resulting objects would be. I thought they would be good for mini-experiments, and they are, up to a point. Per usual, most of the pottery I create is a learning experience.

I started by tracing the outline of each form onto a slab of clay (3/8" thick, I think). I applied the underglaze tissue pieces and wiped them down with a damp sponge before positioning the clay on a piece of foam rubber (purchased at Joann) and centering the wood form on the clay. A quick push downward created the shape. Only then did I remove the transfer.


These pieces are so small the cat underglaze tissue objects barely fit. Being a bit frugal, I cut out some of the half-cats along the paper's edge, then placed them so that they look like they are parading across the dish. I squeezed one cat onto the triangle piece.


The flamingos could not be snipped out individually, so I used the wood form to trace a shape for each of these. As an experiment, I applied pink underglaze before adding the transfer. I have to admit, I like the results.


These were all bisque fired, then I applied clear glaze to just the tops. In the future, I plan to apply the clear glaze all over, and use stilts to keep the pieces off the kiln shelf.


Even with the wood form, there is still a bit of wonkiness on the finished items.


One lesson I learned doing these is to smooth the edges of the slab *before* making the shape. Another lesson is to be more careful creating the shape to eliminate that wonkiness. Yet a third lesson: make sure most of the underglaze transfers from the paper to the clay. I purchased some other transfers, so plan to continue these experiments.

Tuesday, January 16, 2024

Heavy duty tool caddies

I made these two tool caddies (a.k.a. handleless mugs) a while ago, while I was still getting into the habit of documenting my pottery journey. They are really heavy - 20 oz. and 23 oz. If I wanted to use them as short vases, I doubt Beau could knock them over (although with felt feet, they might slide off a table very easily).

After watching a video provided by Amaco on layering PC-31 Oatmeal over PC-33 Iron Lustre, I glazed these. The one on the left has three coats of Oatmeal over three coats of Iron Lustre, with the Oatmeal restricted to the top third of both the inside and outside of the mug. The one on the right is the opposite: three coats of Iron Lustre over three coats of Oatmeal, with the Iron Lustre on just the top third of the inside and outside, plus the heart.

So how did they turn out? Pretty good, if I do say so myself.


Each one is about 4" tall with a 3" diameter. The heartless one has some surface texture.


The way the colors emerge and interact is really interesting. Something to do with chemistry, in which I earned a D in high school. (The only reason I passed is I could balance equations.)


Here is my lesson learned: it is difficult to see in this pic, but the inside bottom did not get fully covered. However, they both hold water.


The purpose of these pieces was to improve my slab-building skills. I have since switched to less thick slabs, although if I wanted to etch deeply into the surface, I would stick with this thickness. (I think these were rolled to 5/8" thick; I now aim for 3/8".) I was concerned the glaze would run right off, so put "cookies" under them, but it was unnecessary.

Sunday, January 14, 2024

Chopstick holder

One of the pieces I made recently at home was a holder for chopsticks. I had been using a drinking glass - perfectly serviceable, but not very decorative. Also, I wanted to improve my slab-building technique.

I posted about this earlier, but I'll repeat myself here so that I have all the information in one place, more or less.

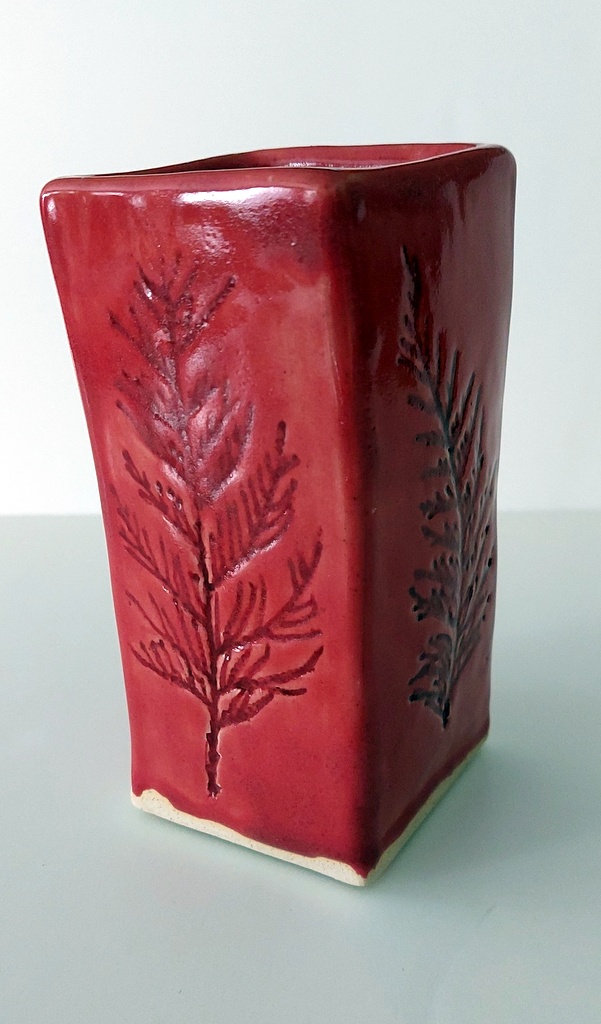
Instead of using a stamp or roller for the design, I snipped some tips off an arborvitae in my yard.


Each side is about 3"x6". I left the sprigs on the clay while I assembled the container, to prevent smudging of the design. That's something one can't do with rollers and stamps.


This is where things get hazy since I didn't take any notes, nor did I post about the progress. I *think* I had it bisque fired, then added detail using underglazes.


I *think* I did not like this red underglaze, so removed it and started over with the original underglazes?


At some point, I applied wax resist to the bottom, using a brush. Then I covered the whole thing with Amaco Celadon 'Snapdragon'. It came out darker than I expected, covering the detail more than I wanted.


But it's functional! It even holds water.


Lessons learned:
  • The wax resist looks uneven along the bottom. I would prefer to dip pieces into wax to get a more even edge.
  • I wish I had used a darker underglaze to accent the detail.
  • The whole thing is a bit wonky, so that is something I need to work on.

Initially, I did not like the transparency of the Celadon glazes, but they are growing on me.

Thursday, January 04, 2024

One ugly sushi boat

One of my complaints about the recent hand-building class I took was lack of oversight by the instructor, as she was busy working on her own stuff during the class. Maybe if she had been paying attention, she would have stopped me from doing this:

Before

After

The colors are okay, but what I did with them is ugh. If I had it to do over, I would have used underglaze on the imprints, then maybe glazed them with the Mayco 'Aurora Green', then glazed the whole thing with the Mayco 'Fossil Rock'.

The accompanying soy sauce bowl is a little better. Because it is so short, the Mayco 'Landslide' pretty much just flowed onto the Mayco 'Peppered Plum', but fortunately did not flow off the piece onto the kiln shelf.

Before

After

My SO and I glazed our bowls on New Year's Day (do we know how to have fun or what?) Mine is my last piece from the class. Going forward, I think my pottery posts will be more project-centric, assuming I remember to take photos and document what I am working on. My goal of reserving Wednesdays for clay-making already failed: I didn't sleep well Tuesday night, slept in Wednesday morning, walked the dogs, then took a long nap in the afternoon, so most of that day was shot. Better luck next week.